Ignition 8 Deployment Best Practices
30 minute read Download PDF
Introduction
This guide is aimed to help you better understand how to deal with deploying Ignition applications and provides some best practices for setting up your development and testing workflow. Having a solid deployment workflow allows for better change management, minimizes mistakes, and leads to a more productive team.
This guide is aimed at Ignition users who are looking to set up a scalable, flexible, enterprise-grade system. Some users start from a different architecture or different model and move toward this, and some users may never choose to employ all recommendations. These guidelines are not intended as an all-or-nothing proposition, and many installations could benefit from employing even a subset of the recommendations contained herein.
For any enterprise-grade system, Inductive Automation highly recommends employing all the techniques covered in this document.
The Workflow
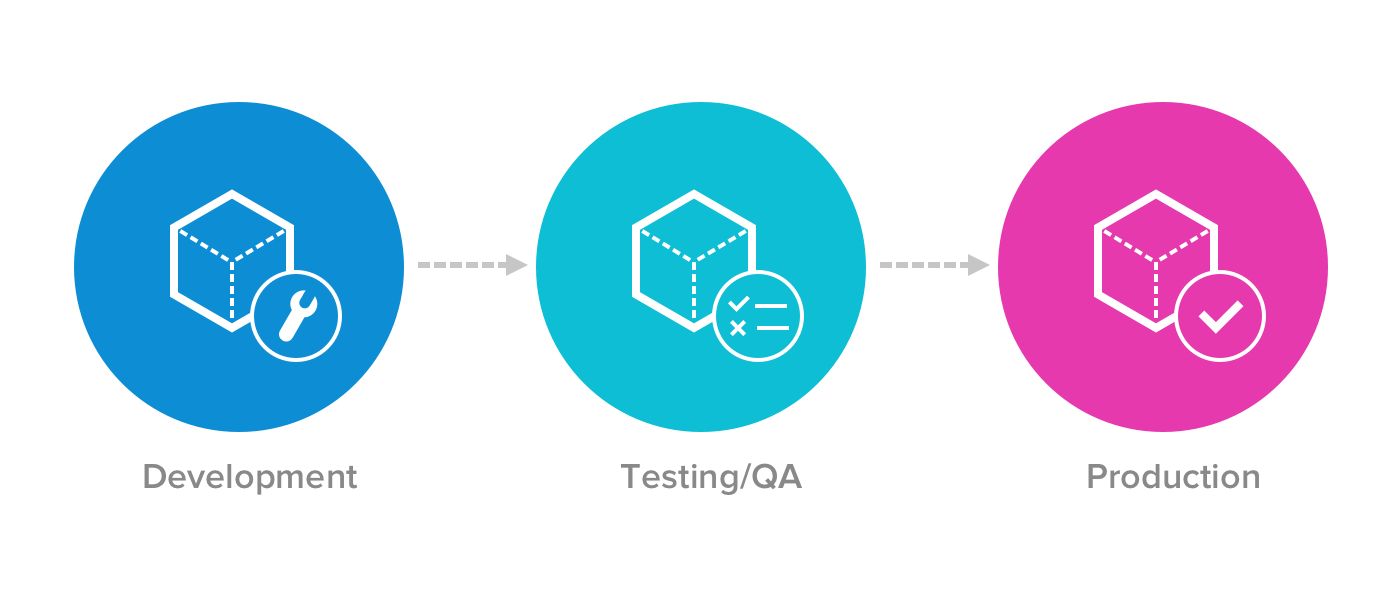
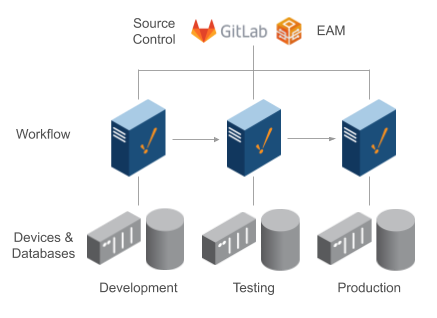
Deployments should be treated as part of a development workflow, not as an afterthought. Your workflow will usually include at least three environments: Development, Testing, and Production. In that case, the workflow might look like this:
- Developers work on bugs and features in a development environment.
- Once features are implemented, they are merged into the testing branch and deployed to the testing environment for quality assurance and testing.
- After testing is complete, the development branch is merged into production and then deployed to the Production environment.
Before taking a closer look at each environment, it is important to look at Ignition’s configuration in more detail to better understand deployment.
Ignition’s Configuration
Ignition is server-based software and installed on a central server. That means all of Ignition’s configuration is stored on the server. It is one place to install, license, configure, backup, and manage. Client applications are downloaded from the Ignition server (Vision) or are native HTML (Perspective) and as a result are automatically updated as new changes are deployed. That way we don’t have to worry about installing, licensing, or deploying changes to individual clients, especially if we have hundreds of clients. For our deployment model, we get to focus solely on the server.
When you are developing in Ignition, there are 4 main areas of configuration:
- Gateway Configuration
- Tags
- Images
- Projects
Each of these areas are stored differently on the server. The Gateway backup contains the configuration for all of these but some can also be handled individually. It is critical to understand the differences and how we interface with them when deploying changes.
Gateway Configuration
The Gateway configuration area includes all of the different settings, profiles, and connections you edit in the Configuration section of the Gateway webpage. This is where most of the settings that affect the whole Gateway are set up. We can add database and device connections, users and roles, adjust alarm settings, set up security, create a schedule for a Gateway backup to be taken automatically at specific times, and much more. The list of configuration options on the left menu changes based on what modules are installed on your Gateway.
All of these settings are stored inside of Ignition’s internal SQLite database. They are only accessible by the Gateway user interface. Outside of a full Gateway backup, you cannot export or import these settings from Gateway to Gateway. Ignition’s EAM Module currently doesn’t support moving these settings from Gateway to Gateway either. This makes it tricky to work with when developing our deployment strategy since all changes must be made manually. It is also difficult to track changes since everything is inside of a SQLite database.
Gateway backups are not normally used when migrating changes because they are all-or-nothing. Different environments often have separate Gateway configuration settings for items such as devices, databases and authentication.
We recommend creating a process that all developers follow to track changes of these settings outside of Ignition and to document the differences in these settings within each environment (development, testing, and production).
Tags
Tags are an important part of most projects. Tags are points of data and may have static or dynamic values that come from an OPC address, an expression, or a SQL query. The values can be used on screens, in transaction groups, and more.
Tags provide a consistent data model throughout Ignition and offer the easiest way to get up and running creating real-time status and control systems. Despite their fast initial learning curve, however, tags offer a great amount of power in system design and configuration. The ability to aggregate Tags from a variety of installations means that you can build widely distributed SCADA systems more easily than ever before with a high level of performance and relatively easy configuration.
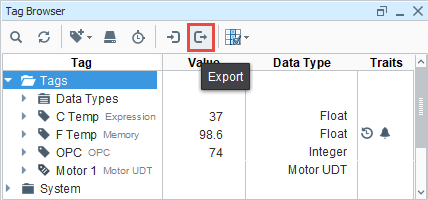
Tags are stored inside of Tag Providers. Tags are not part of an Ignition Project. Rather, projects simply reference tags. A Tag Provider is a collection of tags (a tag database) and can be local or remote. An Ignition server can have one or more tag providers associated with it. Tag Providers can provide logical groupings of tags (separate stores of tags). By default, Ignition is shipped with a local tag provider called “default”. Local tag providers are stored inside of Ignition’s internal SQLite database. Tags are configured inside of the Ignition Designer in the Tag Browser panel.
Ignition can export and import Tag configurations to and from the JSON (JavaScript Object Notation) file format. You can import XML (Extensible Markup Language) or CSV (Comma Separated Value) file formats as well, but Ignition will convert them to JSON format.
Tags can also be moved through Ignition’s EAM Module from Gateway to Gateway. Tags are much easier to work with when deploying changes. However, tags are still stored inside of Ignition’s internal SQLite database and steps must be taken to track changes of tags.
We recommend continuously exporting tags to a JSON file and committing the file to a source control repository to track changes. The process of exporting tags can be done automatically using a Python script in Ignition (more information to follow). You can either use Ignition’s EAM Module to deploy changes from development to testing to production or manually export/import through the Ignition Designer.
Images
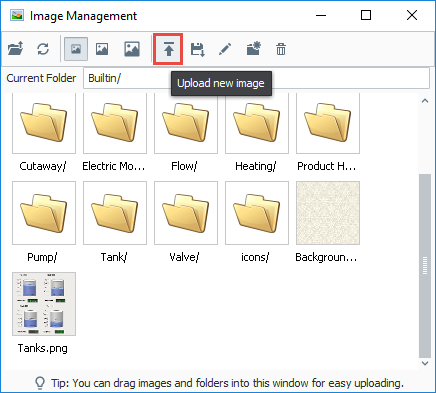
Images such as PNGs, JPGs, GIFs, and SVGs can be uploaded in the Image Management Tool and used inside of Vision or Perspective. The Image Management tool, available from the Tools > Image Management in the Ignition Designer, provides an interface to upload, download, or select images.
These images are stored inside of Ignition’s internal SQLite database and are not part of an Ignition Project. Rather projects simply reference images.
Images cannot be moved through Ignition’s EAM Module from Gateway to Gateway. The process is manual and requires using the Image Management tool in the Ignition Designer. Steps must be also taken to track changes of images.
We recommend continuously exporting images to a folder and committing the folder to a source control repository to track changes. This process cannot be done automatically and requires manual intervention. You have to export/import images through the Ignition Designer when deploying changes from development to testing to production.
Projects
Projects are the main unit of configuration in Ignition. Projects hold all the designed elements that do the real work. Your projects can hold both interactive elements (like controls, charts, reports, entry forms, and more) and persistent elements (like historical loggers, automated reports, etc.).
In Ignition, a project is a unit of configuration that contains:
- Vision Windows & Templates and Perspective Views: Screens users interact with
- Transaction Groups: A bi-directional link between databases and PLCs
- Reports: PDF reports for displaying and recording data
- Scripts: Timer and event-based scripts used throughout the system
- Alarm Notification Pipelines: Pipelines that notify users of alarm conditions
- General settings and properties: The settings that control access, resource connections, layout, timing, and more.
- And much more
You use the Ignition Designer to configure and create projects. The projects are then viewed in the runtime (Vision Clients or Perspective Sessions). You can create as many projects as you want, and users can easily jump between projects on the fly or open multiple projects at the same time.
Projects are stored in the file system as a series of folders and files. Some files are binary, while others are stored as plain text files. Projects are stored inside the data directory on the Ignition server.
Linux
/var/lib/ignition/data/projects
Windows
C:\Program Files\Inductive Automation\Ignition\data\
projects
Since projects are stored in the file system, it is possible to use best-in-class source control tools outside of Ignition to track changes of projects, such as Git. Changes in the Ignition Designer get updated in the file system. Ignition also continuously monitors the file system for changes and automatically reads in the changes.
Projects can also be imported and exported through a file (.zip extension) and moved from Gateway to Gateway using EAM.
We recommend using an external source control tool to track project changes, such as Git. You can turn the project folder into a repository and use tools to deploy changes from development to testing to production environments outside of Ignition.
Change Track Summary
| Gateway Configuration | Tags | Images | Projects | |
| Change Tracking | Manual Documentation and Gateway Backup, then commit to Version Control | Tag Export, then commit to Version Control | Image Export, then commit to Version Control | No export required. Auto-commit project folder changes to Version Control |
| Backups | Gateway Backup | Gateway Backup | Gateway Backup | Gateway Backup |
Deployment Environments
Now that we have a good idea of how Ignition’s configuration is stored and works, let’s take a closer look at each environment to see what are the most efficient ways to deploy to each one of them. In the reference architecture below you will see all 3 separate Ignition environments (development, testing, and production) along with Ignition’s EAM Module and a source control system such as GitLab.
Environments
Development
The development environment (dev) is the environment in which active Ignition development is occurring. This environment is the first step of the workflow. Here developers are working on bug fixes and new features before introducing them to the production environment. It is very handy to have a separate branch in your source control system called development to represent your development environment.
There are 2 main camps on how to approach the development environment: using a shared development environment or using individual workstations as their own development environment. A shared development environment is where you have a central Ignition server dedicated to development that all developers work on. An individual development environment is one where each developer has Ignition installed on their workstation with their branch of the project. There are pros and cons to each approach. Ignition supports concurrent development and most customers tend to go with a shared development environment so nothing has to be installed on each developer’s workstation. They can just launch the Designer from the development server. If an individual development environment approach is taken, each developer’s workstation will need to have its Ignition Gateway configured separately. Regardless of the approach, changes will need to be committed to the source control repository and deployed through the workflow.
Of course, this presents some real questions that need to be addressed.
Do I need the development and testing environments to be licensed?
No. You can simply use Ignition’s trial license for the development and testing environments. Some customers elect to purchase licenses for these environments to remove having to reset every 2 hours. The choice is completely yours.
What are the differences in Ignition’s configuration for each environment?
It is extremely important to understand the Ignition differences in each environment. They cannot be exactly the same. The production environment is communicating to live data sources such as devices and SQL databases and more. You may not want your development and testing environments connected to the same live data sources. You also may have different authentication sources or permission models on the development and testing environments. Here is a small list of common differences:
- Devices or PLC connections: Using Ignition’s native drivers
- OPC UA connections: Connecting to third-party such as Kepware or a PLC directly
- Database connections: Connecting to a SQL database such as MySQL or MS SQL
- Authentication profiles: Different authentication sources or especially a different admin or root password. Sometimes you want to lock out access to the Designer and Gateway in the production environment.
- Alarm notification profiles: Connections to email, SMS, or voice
- Redundancy settings: Often you have redundancy on production and not development or testing.
We recommend keeping the same connections on each environment but with different IP addresses or settings behind the scenes. That way any resources dependent on knowing the name will still function from environment to environment. For example, you may have a dedicated SQL database for each environment. All 3 Ignition Gateways will have the same database connection by name but they will point to their dedicated SQL database that may be local or remote. Screens or named queries using that connection will function across all environments since they referencing the connection by name.
Document these differences to ensure you don’t deploy a change to production that points to a development or testing system.
How do I simulate real device data on development and testing?
This is a very common question since you want to have access to live data in all environments. Sometimes there are limitations or performance issues that must be understood. For example, some PLCs don’t support more than 1 connection or would get saturated with multiple Ignition servers polling the same tags multiple times. There are several ways to accomplish getting access to real data:
- OPC UA: You can connect your development and testing environments to your production environment through OPC UA. The development environment would have the same OPC server name but it would point to production instead of pointing to itself. Be careful, as it is possible for development and testing to affect production, especially with writing to tags.
- MQTT: This is the recommended way of getting live data to all environments. You can have your production environment publish all tag data to a central MQTT server using Ignition’s MQTT Transmission Module. All 3 environments can subscribe using Ignition’s MQTT Engine Module and tags are automatically discovered. Each environment can subscribe without affecting the other. Again, be careful about potentially writing to live PLCs. MQTT servers have ACLs (access control lists) you can define to make the development and testing environments read-only if needed.
- Gateway Network: You can connect your development and testing environments to your production environment through Ignition’s Gateway Network and set up remote tag providers. The development environment would have the same tag provider name but it would point to production instead of being local. Again be careful about potentially writing to live PLCs. Ignition’s Gateway Network has service-level security to make the development and testing environments read-only if needed. This method is not generally recommended.
- Device Simulation:
- Programmable Device Simulator: This is perhaps the best option if you don’t need live PLC data. Instead, we can use Ignition’s programmable device simulator to simulate PLC data. The simulator allows you to define any tag path you want along with static or dynamic values. Your development and testing environments will use the simulator while the production environment will use the real PLC. As long as you keep the name of the device the same, the tags will be identical across all systems. See the documentation for more details on the simulator: https://docs.inductiveautomation.com/display/DOC80/Programmable+Device+Simulator
- SFCs: If you need more advanced device simulation, SFCs offer deep flexibility. The Programmable Device Simulator provides configurable signals, but the signals don’t change based on a user’s actions. SFCs, paired with memory tags, provide a great way to simulate basic PLC functionality like HOAs and valve statuses, flows, and more.
- PLC Software Simulator: Many PLC manufacturers offer a soft PLC/emulator that can run a real PLC program. If Ignition can connect to the software via OPC, this can be a good option to have the real PLC program with all the tags running in a system that’s completely disconnected from the real equipment.
- Additional PLCs: If you have a system with a small number of PLCs, it can sometimes make sense to have separate physical PLCs for the development and QA environments, especially if PLC programming changes may be rolled out at the same time as Ignition project changes.
What about custom SQL tables that I want synchronized across each environment?
As we discussed earlier, each environment typically has its own dedicated SQL database. You don’t want development and testing working off the same database as production. Generally, this is not a problem for Ignition’s built-in history, alarming, auditing, and transaction groups. However, if you build your own custom tables and interface Ignition with those tables, we have to think about how to ensure those tables (structure) and possible data exist in all environments. Commonly, this is done manually by developers by running the same DDL statements (CREATE TABLE, etc.) in all environments. In some cases, there are tools or replication techniques that can be used by the database system to automate this process. You need to come up with a plan to ensure all 3 environments have the same structure and possibly data such as lookup tables.
Testing
Once the features are implemented and considered fairly stable, they get merged into the testing branch and then deployed to the testing environment. This is when quality assurance kicks in: testers go to testing servers and verify that the project works as intended.
It is very handy to have a separate branch in your source control system called testing to represent your testing environment. It will allow developers to deploy multiple branches to the same server simultaneously, simply by merging everything that needs to be deployed to the testing branch. It will also help testers understand what exactly is on testing servers at the moment, just by looking inside the testing branch.
Production
Once the feature is implemented and tested, it can be deployed to production. The production environment is also known as live, particularly for servers, as it is the environment that users directly interact with.
We recommend always deploying major releases to production at a scheduled time, of which the whole team is aware.
Enterprise Administration Module
The EAM Module provides a secure and intuitive way to manage many Ignition installations from one location. It is ideal for large enterprises that deploy multiple Gateways across vast geographical distances, but even companies with a few Ignition Gateways on a single plant floor can benefit from its ability to monitor performance, and automate backup and recovery from a central location.
With the EAM Module installed, an Ignition Gateway can function as the central Controller Gateway that connects with, monitors, and manages any number of remote Agent Gateways. Use the Controller Gateway to coordinate and automate many administrative tasks for Agent Gateways, including:
- Check health and diagnostics
- Assigning, updating, activating, and deactivating licenses
- Deploying new and updated modules
- Disaster recovery
- Remote backups
- Remote Ignition upgrade
EAM Controller Gateway & Best Practices
We recommend to either set up a dedicated EAM Controller Gateway or use the development environment as the Controller. It is advised to use EAM for health and diagnostics, licenses, backups and disaster recovery, and upgrades. EAM provides the ability to move projects and tags from one environment to another. You can use EAM to move tags from one environment to another but it is not advised to use EAM to move projects since that is best handled through a source control system.
Source Control System
A Source Control System is a version control system designed to track changes in source code and other text files during the development of a piece of software, such as Ignition. This allows the user to retrieve any of the previous versions of the original source code and the changes which are stored. Source control systems provide many benefits:
- Maintain multiple versions of code
- An ability to go back to any previous version
- Developers can work in parallel
- Audit traceability with a clear picture of whom, which, when, where, and what the changes are
- Synchronize the code
- Copy/Merge/Undo the changes
- Find out the difference between versions
- Provides full backup without occupying much space
- Review the history of the change
- Capable for both small and large-scale projects
- Ability to share and work on the code across the globe
There are many source control systems and we recommend using the one you are most comfortable with. GitLab and Git is a very popular open source control system.
Source Control & Ignition
We recommend storing all Ignition resources in a source control system including projects, tag exports, images, and Gateway backups. Projects are best managed through a source control system since they are stored in the file system. It is extremely easy to push and pull projects to and from a source control system. However, it is important to define a process for storing and deploying tags, images, and Gateway configuration since they are stored in Ignition’s internal SQLite database and not individual files.
It is extremely easy to get started using a source control system. We recommend installing a source control system on a dedicated server or VM, or using an existing source control system that’s already set up in your company. Simply set up a project in the source control system for each unique Ignition production environment.
Project Branches
A branch is a version of a project’s working tree. You create a branch for each set of related changes you make. This keeps each set of changes separate from each other, allowing changes to be made in parallel, without affecting each other.
After pushing your changes to a branch, you can:
- Create a merge request to merge changes from one branch to another
- Perform inline code review and preview changes
- Discuss your implementation with your team
Since we have 3 separate environments in our workflow, it is recommended to set up 3 separate branches for each project:
- Master: The main branch used for production
- Testing: The branch used for testing. No development occurs on this branch but changes are merged from development to testing for QA.
- Development: The branch used for active development
Now that we have our project and branches set up, let’s define how to commit our changes to the repository.
Committing & Deploying Changes
Active development is occurring in the development environment. Once the features are implemented and considered fairly stable, it is time to merge them into the testing branch and then deploy them to the testing environment. We recommend storing all Ignition configuration to the repository. Let’s go through each configuration item outlined above: projects, tags, images, and Gateway configuration.
Projects
Projects are stored in the file system which makes it easy to commit to a source control system. Simply make the Ignition project folder the repository. You can find the projects folder on the Ignition server in this location:
Linux
/var/lib/ignition/data/projects
Windows
C:\Program Files\Inductive Automation\Ignition\data\
projects
If the repository on the source control system is empty, simply commit the existing folder to the repository. If no projects exist on the development system, simply pull the repository from the server to add the projects.
Make sure to ignore the .resources folder in your repository. You don’t want that directory committed to the repository since it will be unique for each system. See the example below.
As changes are being made, commit and push the changes from the development environment to the repository using the proper tools (GUIs, command line tools like git).
When we are ready to deploy the changes to testing, we can merge the changes from development to testing and pull the changes from the repository to the projects folder on the testing server.
See the GitLab example below for more details.
Tags
Tags are stored inside of Ignition’s internal SQLite database so they don’t exist as files that we can commit to the repository. However, we can export tags to a file. There are 2 methods for storing tags to the source control system: manual export or automatically using an Ignition Python script to save the file to the repository.
In the manual method, the developer can export tags to a JSON file in the Ignition Designer and save the file in the project folder, listed above, when they are ready to push their changes to the repository. With this method, we can export only when needed versus having to do it automatically on every save in the Designer.
Conversely in the automatic method, we can add a Python script on the “Update” Gateway Event script that gets executed on every Designer save to export tags to a JSON file and save the file in the project folder. This is really the best method. See the GitLab example below for more details on the script.
Regardless of the method, it is important to commit the changes to the repository in order to track changes from version to version. We recommend storing the tags.json file to the following location:
<IGNITION INSTALL DIRECTORY>/data/projects/tags.json
The file will be ignored by Ignition.
When we are ready to deploy the changes to testing, we can merge the changes from development to testing and either use Ignition’s EAM Module to deploy tag changes or import the tags into the testing server in the Designer.
If using the EAM Module to deploy tag changes, see this page for more information:
Images
Images are stored inside of Ignition’s internal SQLite database so they don’t exist as files that we can commit to the repository. However, we can export images to a folder. Here the developer can export images in the Image Management Tool in the Ignition Designer to a folder inside of the projects folder when they are ready to push their changes to the repository. Make sure to select all images and folders in the Image Management Tool. We recommend creating a “.images” directory in the projects directory, and storing the images in the newly created directory:
<IGNITION INSTALL DIRECTORY>/data/projects/.images
Generally you would not want to create folders in the projects directory since the Gateway assumes every folder is a project. However the Gateway will ignore any hidden directories, or those that start with a “.” character.
When we are ready to deploy the changes to testing, we can merge the changes from development to testing and import the images into the testing server in the Designer.
Gateway Configuration
Gateway configuration is stored inside of Ignition’s internal SQLite database and doesn’t have any export and import functions. With that being said, we recommend storing the latest Gateway backup (.gwbk) to the repository. Here the developer can save a Gateway backup in the Gateway configuration web page when they are ready to commit their changes to the repository.
We recommend creating another hidden directory in the projects directory to store the latest Gateway backup, similar to how images are stored in the previous section. Call this new directory “.gateway_backups”:
<IGNITION INSTALL DIRECTORY>/data/projects/
.gateway_backups/Ignition-backup-XXXXXXXX-XXXX.gwbk
When we are ready to deploy the changes to testing, we can merge the changes from development to testing and manually make the necessary Gateway configuration changes on the testing server.
Define Your Workflow and Process
You need to define your own workflow and process that is understood by everyone. Make sure to address all of the questions listed above. Document the process and provide each developer with a cheat sheet. We also recommend creating a checklist when deploying to ensure accuracy.
GitLab Example
- Install GitLab
Follow the instructions below to install GitLab on a central server or VM:
https://about.gitlab.com/install/
- Setup Your Root Password
You will use this root user when using Git
- Generate a Personal Access Token
Follow the instructions below to create a token for auto-publishing:
https://docs.gitlab.com/ee/user/profile/personal_access_tokens.html
Make sure to check all scopes.
- Set Up New Project (Repository)
From the dashboard, create a new project with whatever name you would like. The project will be empty by default.
- Setting Up Production Environment
Let’s assume your production environment is already set up. You can simply install the Git command line tools and publish your projects to the repository.
Install Git Command Line Tools
Windows
https://git-scm.com/download/win
Linuxsudo apt-get install git
Identify Yourself in Git
Run the following commands:
git config --global user.name "YourUserName"
git config --global user.email "your@email.addr"
Publish Projects to Repository
Navigate to the following directory:
<IGNITION INSTALL DIRECTORY>/data/projects
First add a .gitignore file to ignore the .resources directory.
nano .gitignore
Add the following line to the .gitignore file:
.resources/
Save the file. Now run the following commands to initialize and commit the repository:
git init
git remote add origin http(s)://root:TOKEN@URL/root/PROJECT.git
git add .
git commit -m "Initial commit"
git push -u origin master
After the initial commit, set the branch to master for future pushes.
git branch --set-upstream-to=origin/master
We have now successfully committed our projects. We also need to export and commit tags, images, and Gateway configuration. For tags, we can export the tags from the Designer into a tags.json file. For images, we can use the Image Management Tool in the Designer to export all images to a folder called “images”. For Gateway configuration, simply make a Gateway backup. Take all files and folders and store them into the projects directory. Once added, use the following commands to commit them to the repository:
NOW=$(date +"%m-%d-%Y %H:%M:%S")
git add .
git commit -m "Designer save @ $NOW"
git push origin
Adjust the script above for Windows. Everything is now saved to the repository.
- Create Development & Testing Branches
Use the web interface to create a development and testing branch off of the master branch. They will automatically have everything committed to the master branch. Follow these instructions:
https://docs.gitlab.com/ee/gitlab-basics/create-branch.html
- Setting Up Development & Testing
Install Ignition on dedicated development and testing machines or VMs. Follow instructions above to install Git. Once Git is installed, navigate to the following directory:
<IGNITION INSTALL DIRECTORY>/data
Remove the projects folder that already exists. It is empty since it is a fresh install. Once removed, run the following commands in that directory:
git clone http(s)://root:TOKEN@URL/root/PROJECT.git projects
Navigate into the projects folder now that is created again. Run the following commands to switch to the development or testing branch:
git checkout development
git branch --set-upstream-to=origin/development
Switch “development” above with “testing” for the testing branch on the testing server.
Lastly, we need to make sure to import the tags and images in the Designer. You can either use EAM to import tags or import manually in the Designer. We also need to manually merge in all Gateway configurations such as creating database or device connections, setting up authentication profiles, and more. Unfortunately, this is a manual step but important to track changes with these areas.
- Auto Committing Changes from Development
Now that we have the development environment set up and the projects have been pulled from the development branch, we need to set up Ignition to automatically commit changes when a developer presses save in the Ignition Designer.
First, we need to create a batch / shell script in the data directory called “git-auto-commit.sh” or “git-auto-commit.bat”, for example on Linux:
/var/lib/ignition/data/git-auto-commit.sh
The file will contain the following lines:
cd /var/lib/ignition/data/projects
NOW=$(date +"%m-%d-%Y %H:%M:%S")
git add .
git commit -m "Designer save @ $NOW"
git push origin
Adjust the script above for Windows. Make sure the file has executable permissions. Next, we need to call this script every time a developer presses save in the Designer. Open the Ignition Designer and select Project > Gateway Events > Update. See the documentation for more details:
https://docs.inductiveautomation.com/display/DOC80/Gateway+Event+Scripts#GatewayEventScripts-UpdateScript
Add the following script:
import time
time.sleep(5)
system.util.execute(["/var/lib/ignition/data/git-auto-commit.sh"]
)
The script will call the batch/shell script and commit the changes to the repository on every save. Save the project and check out the repository in GitLab to see the commit.
- Auto Committing Tags
It can be handy to automatically export tags and save them to the repository as part of the save process. For that, simply adjust the Gateway Event Update script to the following:
import time
filePath = "/var/lib/ignition/data/projects/tags.json"
system.tag.exportTags(filePath=filePath, tagPaths=["[default]"])
time.sleep(5)
system.util.execute(["/var/lib/ignition/data/git-auto-commit.sh"]
)
Adjust the tag paths to include all of your tag providers you want to export. Tags will get exported and saved to a file called tags.json inside of the projects directory on every save. The commit occurs after the export so the file will get committed to the repository.
- Deploying Changes
Once we are done with our development we need to deploy the changes to the testing environment. First, we need to merge changes from the development branch to the testing branch inside GitLab. Open the UI and create a merge request from the development branch to the testing branch. By default, it will select the master branch so make sure to change that to the testing branch. Make sure to uncheck the “Delete source branch” checkbox so you don’t remove the development branch. See GitLab’s documentation for more details:
https://docs.gitlab.com/ee/user/project/merge_requests/creating_merge_requests.html
Once the merge request is created, you need to approve the request and actually merge the changes to testing. Once the changes are merged we need to deploy our changes to Ignition on the testing server.
- Deploying Projects
For projects, we just need to pull the changes from the repository. Run the following command on the testing server:
git pull
Once the changes are pulled down, Ignition will automatically update the project resources. Clients will update automatically. If you already had the Ignition Designer open, you will need to press File > Update Project to pull those changes from the server.
- Deploying Tags
The tags.json export file will get pulled from the previous step. You can either manually import the tags into testing or use EAM to deploy tag changes.
- Deploying Images
The images will get pulled from the repository from the previous step. You will have to manually import the images into the Image Management Tool in the Ignition Designer.
- Deploying Gateway Configuration
You will have to manually apply any Gateway configuration changes to the testing environment. This includes changing settings, adding database connections, adding device connections, and more. This is arguably the hardest part of deploying changes from development to testing and from testing to production. DO NOT restore the Gateway backup when deploying testing or production as there are differences in each environment.
- Deploying Projects
Last Updated on: November 4, 2024

About The Company
Inductive Automation
Inductive Automation is a leader in industrial automation
software that empowers its customers to “Dream It, Do It.”
It was founded in 2003 by Steve Hechtman, a prominent system
integrator with a quarter-century of experience, who was
determined to solve SCADA pain points. As a result, the
company created its flagship product Ignition, the #1
platform for SCADA, HMI, IIoT, MES, and more.
In business and privately owned for over 20 years,
Inductive Automation’s global presence is flourishing:
140+ countries have Ignition installations, there are
4,000+ integrators in its integrator program, and 65% of
the Fortune 100 use Ignition. The company has earned
numerous industry accolades, and was recently recognized
in Automation World’s 2025 Leaders in Automation program
in five categories.
Want to stay up-to-date with us?
Sign up for our weekly News Feed.
By clicking "Sign me up," you agree to Inductive Automation's Terms of Use and acknowledge that you have read Inductive Automation's Privacy Policy.